

Shoplifting Prevention Camera Placement: A Manager's Checklist
Cover five zones or nothing else you do will matter: entrances and exits, every POS lane, high-value displays, fitting-room entry corridors, and stockroom transitions. Mount identification cameras at roughly 2.5 to 3 meters, overlap fields of view so no gap exists between cameras, and target 250 or more pixels per meter on faces at every point where you need to identify a person later. Storefront cameras need 120 dB or higher wide dynamic range (WDR) to handle sunlight without washing out faces. Use visible cameras where deterrence matters most, and reserve covert placements for internal-theft investigations only. Professional systems from a provider like Safes and Security Direct simplify getting these specs right the first time.
- Entrances/exits: identification-grade capture, two-camera setup
- POS/registers: one camera per lane, angled to catch face and cash drawer
- High-value displays: tight spacing, higher resolution
- Fitting-room corridors: exterior coverage only, never inside
- Stockroom/receiving: movement paths and doors, not shelf-by-shelf detail
Pro Tip: Walk the sales floor at your store’s worst lighting hour, usually late afternoon near west-facing glass, and check whether faces are actually visible on the monitor. If you can’t verify identity from the recording, no amount of extra hardware elsewhere fixes it.
Key Takeaways
Effective shoplifting prevention comes down to placing identification-grade cameras at entrances, POS lanes, and high-value displays with overlapping coverage and correct mounting height.
| Point | Details |
|---|---|
| Prioritize five zones | Entrances, POS lanes, high-value displays, fitting-room corridors, and stockroom transitions need coverage first. |
| Hit the pixel target | Aim for 250+ pixels per meter on faces at every identification point, not just high resolution overall. |
| Control backlight | Use 120 dB+ WDR cameras at storefronts and entrances to stop sun glare from washing out faces. |
| Audit views regularly | Schedule checks after merchandising resets since most blind spots develop after installation, not at setup. |
| Get professional installation support | Safes and Security Direct offers surveillance systems with detailed specs and installation help matched to retail zones. |
Table of Contents
- Why Camera Placement Matters More Than Camera Count
- Where Should You Place Cameras in Each Store Zone?
- Which Camera Types Fit Each Zone?
- What Technical Settings Actually Matter for Loss Prevention?
- How Does Lighting Affect Where You Place Cameras?
- How Should Cameras Integrate With POS and Analytics?
- What’s the Realistic Installation Timeline and Cost?
- How Do You Eliminate Blind Spots Beyond Basic Overlap?
- What Should Employees and Customers Know About Surveillance?
- How Should You Store and Secure Recorded Footage?
- How Do Cameras Work With Tags and Alarms?
- What Are the Legal Rules for Camera Placement?
- Get Professional Camera Systems Built for Retail Loss Prevention
- Frequently Asked Questions
- Sources
Why Camera Placement Matters More Than Camera Count
Correct placement does two jobs at once: it discourages theft before it happens, and it produces footage that actually holds up when you need to identify someone or support a prosecution. Retailers who assume more cameras equal better coverage usually end up with redundant wide shots and no identification-grade footage where it counts.
Visible cameras at entrances and high-theft displays reduce opportunistic attempts because most shoplifters are calculating risk in real time, not planning a heist. Cameras positioned for identification, meaning correct height, angle, and pixel density, shorten investigation time and give loss prevention teams footage that survives scrutiny in court.
- Visible placement deters casual and opportunistic theft
- Identification-grade angles speed up case resolution and recovery
- Cameras paired with active monitoring or analytics stop incidents in progress instead of just documenting them afterward
None of this works if the hardware is aimed at the wrong spot. A layered coverage strategy, identification at entrances, transaction monitoring at POS, and general observation across the floor, is the foundation almost every effective retail camera plan is built on.
Where Should You Place Cameras in Each Store Zone?
Every zone has its own job. Treat them as separate problems, not one blanket coverage plan.
Entrances and exits. This is the single most important camera position in the store. Use a two-camera approach: one wide-angle camera for scene context, one tighter lens for facial capture. Mount both at 2.5 to 3 meters to avoid backlight problems from glass doors and to keep the facial angle usable.
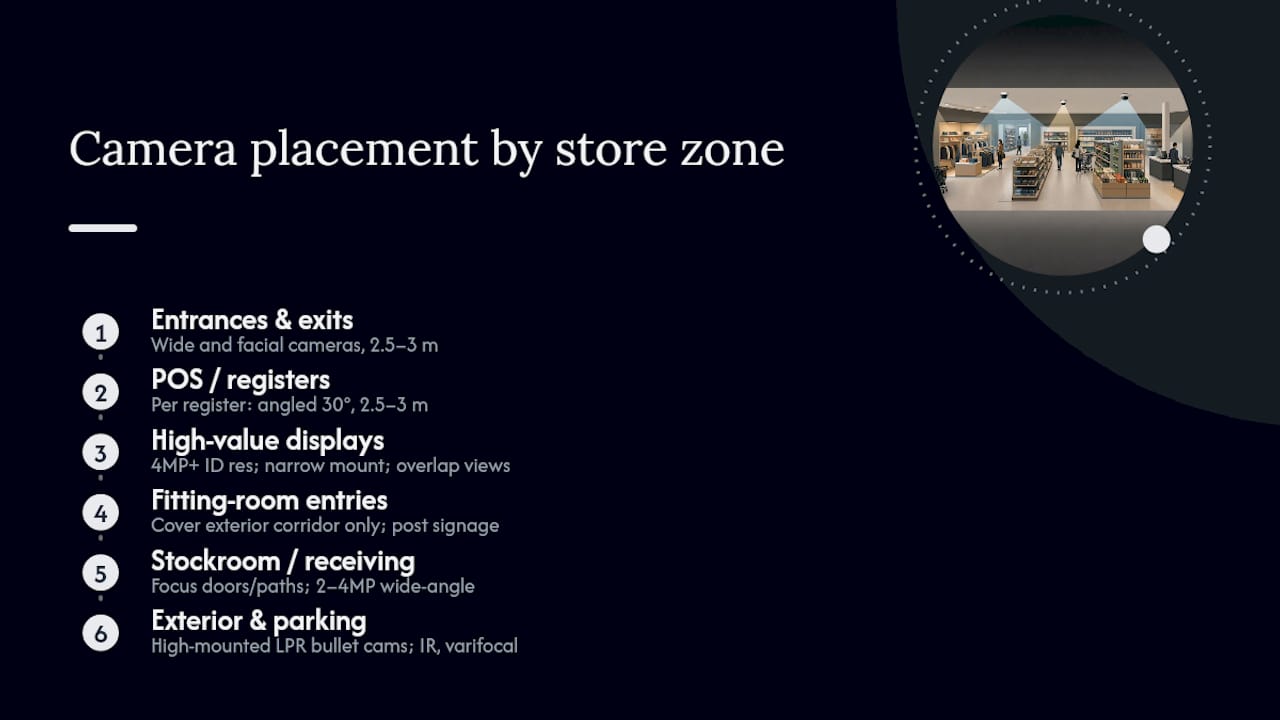
POS and registers. Give every register its own dedicated camera, angled about 30 degrees off the customer-register axis at 2.5 to 3 meters high. Done right, one frame captures the drawer, the scanner, and the customer’s face simultaneously.
High-value displays. Electronics, jewelry, and locked cases need identification-level resolution, 4MP or better, with narrower lenses or closer mounting than general sales-floor coverage. Overlap fields of view here specifically, since these are the spots where someone will step into a gap on purpose.
Fitting-room entry corridors. Cover the exterior corridor and entry point only. Never point a lens inside a private changing area, under any circumstance. Pair the camera with visible signage explaining the coverage zone.
Stockroom and receiving. Focus on doors and movement paths, not shelf-level detail. A 2 to 4MP wide-angle camera is usually enough to track who came in, when, and with what.
Exterior and parking. Where organized retail crime is a known risk, add license plate recognition (LPR) cameras. Higher-mounted bullet cameras with varifocal lenses and infrared (IR) illumination handle plate capture in low light.
Which Camera Types Fit Each Zone?
Dome cameras handle general aisle and sales-floor coverage well because their housing hides the lens direction, which keeps would-be thieves guessing. Mini-domes suit POS stations for the same discreet-but-visible reason. Pan-tilt-zoom (PTZ) cameras work as a supplement on large open floors, but a PTZ locked onto one incident leaves the rest of the store unwatched, so never treat it as a replacement for fixed cameras. Bullet cameras belong outdoors, where their visible housing and IR range suit parking lots and exterior transitions. Fisheye cameras give you a single ceiling-mounted view of an entire room, useful in smaller boutiques or stockrooms where budget or wiring is limited.
Mounting height depends on ceiling height and purpose. Standard sales floors run 3 to 4 meters, but drop to 2.5 to 3 meters wherever facial identification is the goal. Where ceilings run higher than that, pendant mounts or wall brackets bring the camera down to a usable angle without an awkward downward tilt that distorts faces.
- Vandal-resistant housings for cameras within reach of the public
- Tamper alarms tied to the video management system
- Lockable junction boxes and concealed conduit runs in high-risk zones
Covert cameras have a narrow, specific job: internal-theft investigations, never general floor coverage. Rotate their position periodically, and confirm your legal and HR documentation is in order before you deploy one.
Pro Tip: Space standard sales-floor domes every 25 to 35 feet, then tighten that spacing in high-value aisles. A uniform grid looks thorough on paper but leaves the exact spots thieves target the most under-covered.
What Technical Settings Actually Matter for Loss Prevention?
Resolution matters, but not in isolation. A camera with a high megapixel count aimed at the wrong angle still won’t identify anyone. Prioritize identification-grade resolution, wide dynamic range, and a reasonable frame rate over chasing the highest megapixel number on the spec sheet.
For POS stations and high-value displays, use 4MP or better. General observation across the sales floor can run on 2 to 4MP cameras without losing usefulness. The target that actually matters is 250 or more pixels per meter on a face at your identification points, whatever resolution gets you there.
Storefronts and backlit entrances need 120 dB or higher WDR, or an HDR-capable sensor, so morning and afternoon sun doesn’t silhouette every customer walking in.
Statistic Callout: Cameras at entrances without adequate WDR routinely produce unusable, overexposed faces during peak sun hours, which is one of the most common and easily fixed placement failures in retail loss prevention.
- 4MP+ at POS and high-value display cameras
- 2 to 4MP acceptable for general sales-floor observation
- 120 dB+ WDR at every backlit or storefront position
- Retention length set to match store policy and applicable legal requirements, with compression settings that preserve facial detail rather than just saving disk space
How Does Lighting Affect Where You Place Cameras?
Uncontrolled light is one of the most common reasons a technically correct camera install still fails in practice. Glare off glass doors, headlights sweeping a parking lot camera, or a sunset hitting an entrance dead-on will all defeat an otherwise well-placed camera.
Position cameras on the same side as strong light sources whenever the floor plan allows it, rather than facing directly into them. Use WDR-capable cameras at every entrance regardless of orientation, and add hooded mounts or shading where afternoon sun is a known problem.
- Re-check camera views after every merchandising reset, not just at install
- Watch for trees, seasonal banners, and temporary displays creating new blind spots
- Schedule periodic view audits rather than assuming coverage stays static
Roughly 58% of camera blind spots emerge after installation, not on day one, driven by exactly this kind of environmental and operational drift.
Pro Tip: Put a recurring calendar reminder on your phone, tied to seasonal merchandising resets, to walk every camera view on the monitor wall. It takes fifteen minutes and catches problems before a loss happens, not after.
How Should Cameras Integrate With POS and Analytics?
Placement alone only gets you passive footage. Integrate identification cameras with your point-of-sale system and analytics rules so suspicious events get flagged automatically instead of discovered days later during a review.
Time-syncing cameras with POS receipts lets investigators jump straight to the frame tied to a suspicious transaction instead of scrubbing hours of footage. Analytics rules for loitering near high-value displays or concealment gestures add another layer, flagging behavior before a theft is even complete.
- Define exactly who receives real-time alerts, whether that’s a floor manager, a monitoring operator, or a regional LP team.
- Set a validation step so staff confirm an alert before escalating, which keeps false-alarm fatigue from burning out your team.
- Document the escalation path to on-site security or management so a confirmed alert turns into action, not just a note in a log.
What’s the Realistic Installation Timeline and Cost?
Plan an installation in five steps: site survey and zone mapping, camera type selection, mounting and conduit planning, cable runs or Power over Ethernet (PoE) provisioning, and network/NVR configuration, followed by POS integration and final field-of-view testing.
- Site survey: roughly one day to map zones, lighting conditions, and existing wiring.
- Hardware procurement: one to two weeks depending on camera specs and stock availability.
- Installation: one to three days depending on store size and camera count.
- Testing and staff training: one additional day to verify coverage and walk staff through the system.
Per-camera costs vary widely based on resolution, housing, and whether you need LPR or active monitoring, and a full store system typically runs into a broader bracket once labor, NVR hardware, and cabling are included. High-resolution cameras, license plate recognition, and live monitoring subscriptions all push costs upward.
Statistic Callout: Verify actual pixel density at every identification point before signing off on an install. A camera rated at 4MP on the box can still fall well under 250 pixels per meter on a face if it’s mounted too far back or too high.
Finish with a post-merchandising walkthrough once shelving and displays are in their normal operating positions, since a store dressed for install day rarely looks like a store on a Saturday afternoon.
How Do You Eliminate Blind Spots Beyond Basic Overlap?
Standard field-of-view overlap catches most gaps, but it misses the ones created by human behavior, not camera math. Shoplifters learn a store’s blind spots faster than most managers update their camera plan, especially around fixture corners, tall shelving endcaps, and the dead zone directly beneath a ceiling-mounted dome.
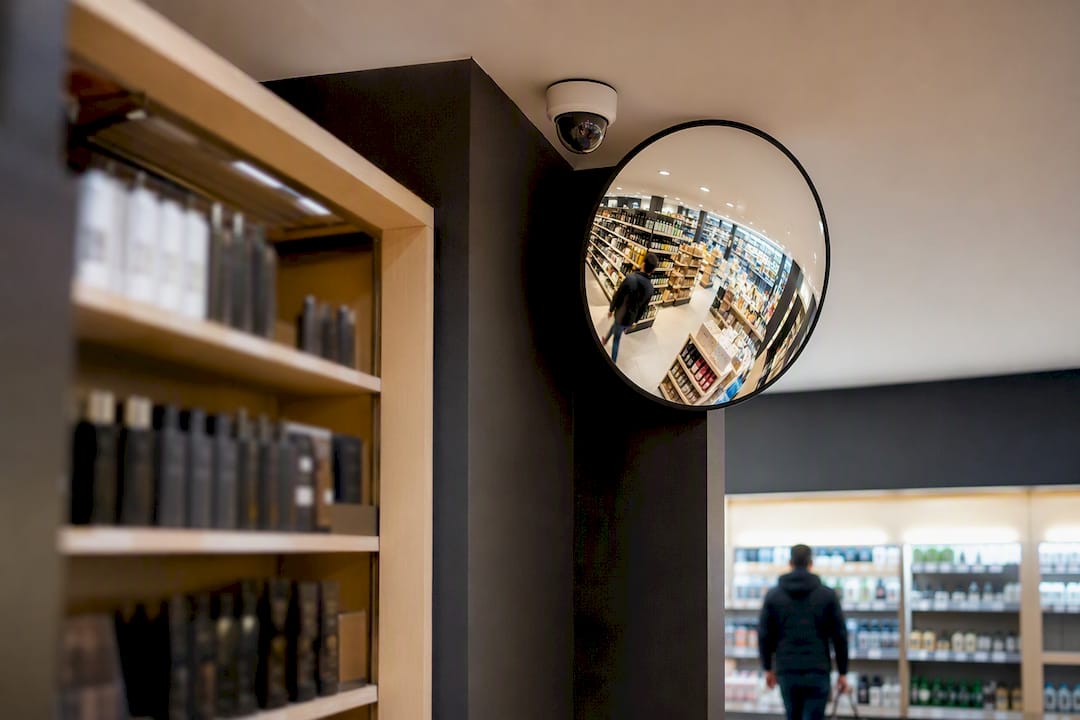
Convex mirrors placed at aisle intersections and blind corners do something cameras can’t: they change what a potential shoplifter believes is being watched in that exact instant, even where a camera genuinely can’t reach. Combine that with a second camera angle on any endcap taller than eye level, since a single overhead dome loses the vertical face of a display the moment someone crouches or turns sideways.
Multi-angle coverage matters most in three spots: behind tall shelving where a single overhead view only sees the top of someone’s head, inside recessed doorways or alcoves near fitting rooms, and along any wall where merchandise sits below camera height. A second camera at a lower, angled position closes each of those gaps without requiring a full sales-floor redesign.
Run a physical blind-spot walk twice a year, not just after installation. Stand at register height, at fixture height, and crouched at low-shelf height in every aisle, then check the monitor wall from each position. If you can’t see yourself clearly from all three, neither can the camera when it matters.
What Should Employees and Customers Know About Surveillance?
Transparent notification isn’t just good ethics. It’s also the deterrence lever that visible cameras only partially deliver on their own, and it protects the business from disputes over how footage was collected.
Post clear signage at every entrance stating that the premises are under video surveillance, positioned where an arriving customer will actually see it, not buried near a service door. For employees, notification should go further than a sign: include surveillance policy in onboarding paperwork, specify which areas are monitored, and state clearly that private spaces like restrooms and fitting-room interiors are never recorded.
Draw a hard line between deterrence-focused visible cameras and any covert placement used for internal investigations. Visible cameras handle the bulk of deterrence against casual theft, while covert cameras are reserved narrowly for documented internal-theft cases, with legal and HR sign-off obtained before deployment, not after. Employees should know in general terms that internal investigation tools exist, even if specific covert locations stay undisclosed for obvious reasons.
Keep a written surveillance policy on file that spells out what’s recorded, where, for how long, and who can access it. This single document does double duty. It sets employee expectations up front, and it becomes the reference point if a legal question ever comes up about how footage was collected or used.
How Should You Store and Secure Recorded Footage?
Footage is worthless as evidence if it’s compromised, tampered with, or simply gone when you need it. Set retention periods that match both your internal loss-prevention policy and any applicable state or local record-keeping requirements, and document that retention schedule in writing rather than leaving it to whatever the NVR defaults to out of the box.
Restrict access to recorded footage with role-based permissions. A shift supervisor pulling footage to resolve a customer dispute doesn’t need the same access level as a regional loss-prevention director investigating an organized theft ring. Every access event, who viewed what footage and when, should generate a log entry, both for internal accountability and for chain-of-custody purposes if footage ends up supporting a prosecution.
Cybersecurity matters as much as physical security for this data. Change default passwords on every NVR and camera at installation, since factory credentials are widely published and one of the most common ways outside parties access retail camera systems remotely. Keep firmware updated, segment your camera network from general store Wi-Fi where possible, and use encrypted connections for any cloud storage or remote viewing feature.
Cloud backup adds resilience against a stolen or damaged on-site recorder, which is a real risk in a break-in scenario where the thief’s first move is often to grab the DVR. A system with cloud storage and mobile alerts keeps a copy of footage off-site automatically, so a smashed recorder doesn’t erase your entire case.
How Do Cameras Work With Tags and Alarms?
Cameras alone catch what happened. Electronic article surveillance (EAS) tags and alarms catch it happening, and placing cameras without accounting for your tag and alarm layout leaves gaps in both systems.
Position a camera on every EAS pedestal at exits so a triggered alarm has corresponding footage of who set it off and what they were carrying. Without that camera, an alarm is just a noise. With it, you have an identifiable event tied to a specific person and item.
High-value displays protected by locked cases or spider-wrap tags deserve the same layered thinking. A locked case slows a thief down; a camera positioned to catch the moment someone tries to defeat that lock turns a near-miss into usable evidence. Alarm zones around fitting rooms or stockroom exits should likewise have a camera angle covering the trigger point, not just the general area.
The goal is a single connected system, not three separate ones. When a POS exception report, an EAS alarm, and a camera feed all reference the same timestamp, an investigator reconstructs an incident in minutes instead of hours of cross-referencing three disconnected logs.
What Are the Legal Rules for Camera Placement?
Camera placement law varies by state, and getting it wrong exposes a business to liability regardless of how good the loss-prevention outcome was. Most states allow video recording in areas where there’s no reasonable expectation of privacy, meaning sales floors, entrances, and stockrooms are generally fine. Restrooms, fitting-room interiors, and employee break areas used for personal purposes are not, in nearly every jurisdiction.
Audio recording is a separate and stricter issue in many states. Several require two-party consent for audio, which means a camera system that also records sound can create legal exposure that a video-only system doesn’t. Confirm your state’s audio consent rule before enabling microphones on any camera, even if the video placement itself is fully compliant.
Employee notification requirements differ by state and sometimes by municipality, particularly around covert monitoring in employee-only areas. Where covert cameras are used for internal-theft investigations, document the specific legal basis and any required notice before installation, not as a follow-up step after the fact.
None of this is a substitute for a conversation with legal counsel familiar with your specific state and industry, especially before deploying anything covert or before adding audio capability to an existing system.
One Habit Worth Adopting From Day One
Verify pixels-per-meter at the entrance during peak sunlight before you consider an install finished, not just at setup on a cloudy afternoon. Build that check into your store’s opening routine alongside merchandising resets, so drift gets caught within days, not months.
Get Professional Camera Systems Built for Retail Loss Prevention
Getting mount height, angle, resolution, and WDR right on every camera in a store takes planning most retail managers don’t have time to do alone, which is exactly the gap Safes and Security Direct is built to close. Its surveillance camera systems come with detailed specs for resolution, WDR rating, and mounting hardware suited to each zone covered in this guide, from entrance identification cameras to POS-specific angles.
Beyond the hardware, Safes and Security Direct offers installation support to help translate a zone-by-zone plan like this one into an actual working system, with cloud storage and mobile alerts built in so footage stays accessible even if an on-site recorder is damaged or stolen. If you’re planning a new install or auditing an existing one, explore Safes and Security Direct’s camera systems and get product specifications matched to your store’s specific layout.
Frequently Asked Questions
What is the best height to mount a security camera for shoplifting prevention? Mount identification cameras, meaning those covering entrances and POS lanes, at 2.5 to 3 meters (8 to 10 feet). General sales-floor observation cameras can sit higher, around 3 to 4 meters, where facial identification isn’t the primary goal.
How many cameras does a small retail store need? It depends on square footage and layout, but the minimum functional set covers every entrance, every register, and each high-value display, with sales-floor domes spaced roughly 25 to 35 feet apart in standard layouts.
Should fitting rooms have cameras inside them? No. Cameras should cover only the exterior entry corridor of a fitting room, never the interior. Pair that coverage with clear signage so customers know the corridor is monitored while the changing area itself remains private.
Do visible or hidden cameras work better against shoplifting? Visible cameras deter the majority of opportunistic theft because most shoplifters are weighing risk in the moment. Hidden cameras serve a narrower purpose: documented internal-theft investigations, with proper legal and HR controls in place first.
How often should camera placement be reviewed after installation? Review camera views after every merchandising reset and at least twice a year for seasonal changes like landscaping or holiday displays, since a large share of blind spots emerge after the initial installation rather than at setup.
What resolution do I actually need for loss prevention cameras? Use 4MP or higher at POS stations and high-value displays where identification matters most. General observation areas can run on 2 to 4MP cameras, as long as identification points still hit the 250 pixels-per-meter target on faces.
Sources
- How to Design Retail Store CCTV Layout (2026 Camera Placement Guide)
- Retail Security Camera Systems: A Manager’s Guide - Overton Security Services
- Retail Camera Placement Guide: POS, Entrance, Stockroom