

Cut Camera Bandwidth Up to 75% With 5 Settings for Home & Small Biz
Switching to H.265, dropping resolution or frame rate where you don’t need it, and turning on your camera’s smart-codec feature are the three fastest ways to cut streaming bandwidth.
TL;DR:
- Switching from H.264 to H.265 can halve the bandwidth requirements, especially at higher resolutions like 4K, without sacrificing image quality.
- Lowering resolution and frame rate, particularly from 30 to 15 FPS, provides significant bandwidth savings, with resolution cuts offering a larger impact than frame rate reductions.
- Smart codecs improve efficiency during static scenes but yield limited gains during busy settings with constant motion, requiring compatible hardware and software support.
- Optimizing network settings such as enabling jumbo frames and increasing NIC buffers can reduce retransmissions and packet drops that waste bandwidth.
- Using dual streams for live viewing and recording allows lower bandwidth consumption on real-time feeds while maintaining high resolution for storage and review.
Table of Contents
- How to Reduce Camera Bandwidth: The Five Settings That Actually Matter
- What Are Smart Codecs and Do They Really Save Bandwidth?
- Preventing Network Waste: Switch, NIC, and PoE Settings
- Should You Use Dual Streams for Live Viewing and Recording?
- How Do You Measure and Test Camera Bandwidth Savings?
- A Step-by-Step Checklist for Cutting Bandwidth Safely
- Can Content-Aware Streaming Cut Bandwidth Even Further?
- What Should You Actually Prioritize?
- Safes and Security Direct: Cameras Built to Work With These Settings
- Sources
- FAQ
How to Reduce Camera Bandwidth: The Five Settings That Actually Matter
Five settings decide almost all of your camera’s bandwidth footprint, and they don’t contribute equally. Get the order wrong and you’ll spend a weekend fiddling with GOP length while ignoring the one dial that would have cut your data in half.
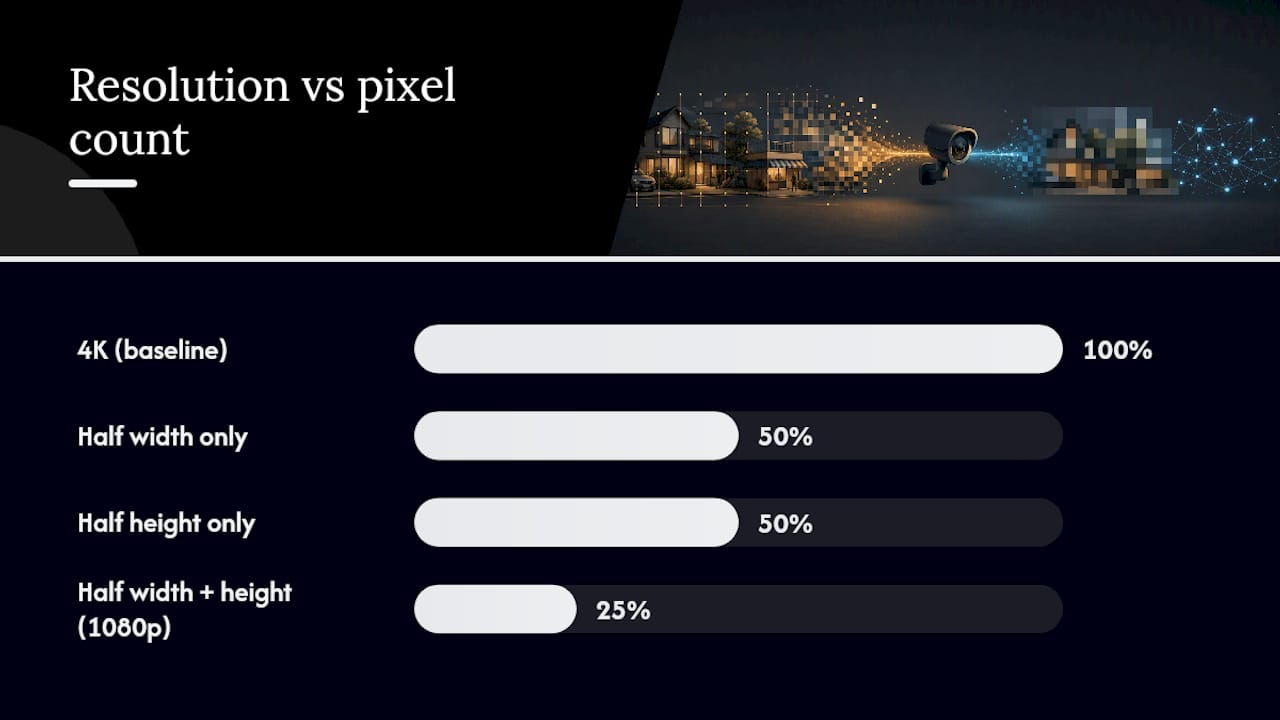
Resolution carries the biggest punch, and it isn’t linear. Cut both height and width in half and you don’t save 50%, you save roughly 75%, because you’ve dropped the total pixel count by a factor of four. That’s why switching from 4K to 1080p on a driveway camera often does more for your bandwidth bill than any other single change.
Frame rate scales in a straight line. Drop a camera from 30 FPS to 15 FPS and you cut its bandwidth roughly in half, since half as many frames means half as much data to encode and send. For most fixed security cameras, 15 to 20 FPS is plenty to identify a face or a license plate; you don’t need 30 FPS unless you’re covering something genuinely fast, like a loading dock with forklifts.
Codec choice is where the real efficiency lives. H.265 (HEVC) typically runs about half the bitrate of H.264 at the same resolution and frame rate, largely because it compresses each frame more intelligently. Ant Media’s comparison puts a 1080p 30fps stream at roughly 2 Mbps on H.265 versus 4 Mbps on H.264, for comparable perceived quality.
Two smaller levers round things out:
- GOP (Group of Pictures) length controls how often a full keyframe gets sent. A longer GOP lowers average bitrate but slows down seeking through recorded footage.
- Bitrate mode (VBR vs. CBR) determines whether your camera flexes with scene activity or holds a flat rate. VBR with a sensible cap saves bandwidth on quiet scenes while still spiking for real motion; CBR is more predictable but wastes capacity on an empty parking lot at 2 a.m.
What Are Smart Codecs and Do They Really Save Bandwidth?
Smart codecs work by spending your bitrate budget where it matters instead of spreading it evenly across the whole frame. Hanwha’s WiseStream, Axis’s Zipstream, and the general category often marketed as H.265+ all do some version of the same three tricks: dynamic region-of-interest encoding, dynamic frame rate, and dynamic GOP length.
Here’s the mechanism in plain terms:
- Dynamic ROI keeps license plates and faces sharp while letting flat, static background (a wall, a parking lot with no cars moving) compress harder.
- Dynamic FPS drops frame rate automatically on a static scene, then ramps back up the moment motion appears.
- Dynamic GOP stretches the keyframe interval during quiet periods and shortens it during activity.
Vendor data point: Camera “low bandwidth” or resting modes can cut idle bandwidth by up to 75% and active streaming bandwidth by up to 33%, according to Verkada’s own optimization guidance.
That savings range comes with a catch worth knowing before you flip the switch. Smart codecs deliver their biggest wins on static scenes; a busy retail entrance or a public sidewalk won’t see anywhere near that reduction, because there’s constant motion to encode regardless. Axis’s own Zipstream white paper makes this same point: busy scenes need higher baseline capacity no matter how smart the codec gets. Also check your VMS or NVR decoder before you enable any smart-codec feature. Some older recording software re-encodes the stream on ingest, which can wipe out the savings you just configured on the camera side.
Preventing Network Waste: Switch, NIC, and PoE Settings
Bandwidth waste isn’t always about what the camera encodes. A surprising amount of it comes from retransmits, buffer underruns, and packets your network drops and has to resend, none of which shows up if you only look at codec settings.
- Enable jumbo frames on your switches and NICs, typically an MTU of 8192 to 9014, if your hardware supports it end to end. Larger frames mean fewer packets per second, less CPU overhead, and fewer chances for a dropped packet to force a costly retransmission.
- Increase NIC receive buffers on the machine running your VMS or NVR software. Undersized buffers cause frame drops during multi-camera bursts, and dropped frames often trigger the camera to resend, quietly inflating your real bandwidth use.
- Tune packet size and inter-packet delay (IPD) on GigE cameras specifically. Basler’s GigE tutorial walks through adjusting these settings alongside frame transmission delays so multiple cameras sharing one link don’t collide and force resends.
- Size your PoE switch and uplink for bursts, not averages. A common rule of thumb: budget uplink capacity at two to three times your calculated average load, since synchronized I-frames across several cameras can spike traffic well above the steady-state number.
Pro Tip: Most camera manufacturer capture utilities report a “failed buffers” or “frames dropped” counter. If that number isn’t sitting at zero during normal operation, fix your network tuning before you touch a single camera setting. You’re not saving bandwidth, you’re just resending it.
Should You Use Dual Streams for Live Viewing and Recording?
Yes, and most modern IP cameras support this by default. Dual-stream setups let you assign a low-resolution, low-bitrate stream to your live viewing wall while a separate high-resolution stream feeds your recorder. Nobody needs 4K to glance at a live feed on a monitor across the room, but you absolutely want full resolution sitting in storage if you ever need to zoom in on a face after the fact.
A few architectural choices compound the savings:
- Cap or sequence how many simultaneous remote viewers can pull a live stream at once; each additional viewer duplicates that upload, especially painful on a business’s outbound connection.
- Favor local NVR or edge recording over constant cloud upload when your internet plan has a low upload ceiling. Cloud storage is convenient, but it turns every camera into a 24/7 upload source.
- If you do use a cloud service, understand that its “bandwidth” budgeting is really an upload budget, not the same math as your local network capacity planning.
How Do You Measure and Test Camera Bandwidth Savings?
Datasheet numbers are a starting point, not a fact. Real-world bitrate on the same camera can run anywhere from 0.4 to 1.6 times the manufacturer’s published figure, depending on scene complexity, lighting, and motion. Pull your numbers from the camera’s own reported throughput, your router or switch counters, or your VMS’s bandwidth monitor, not the spec sheet.
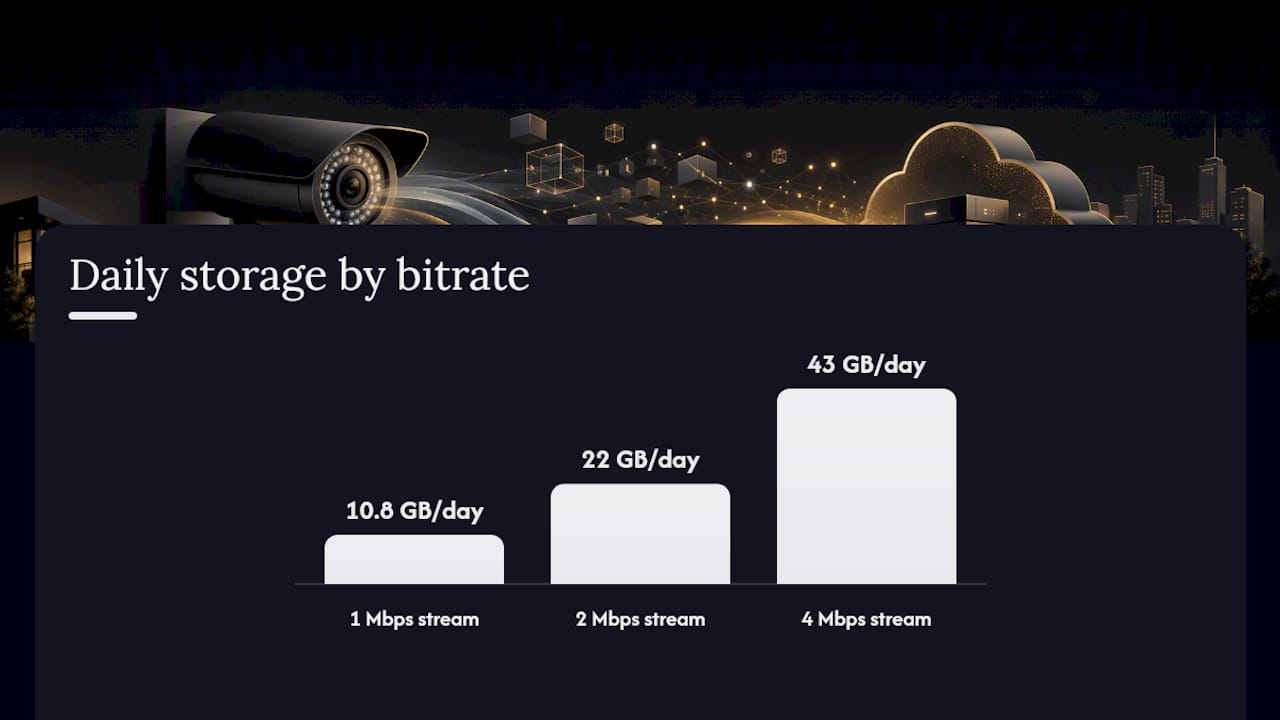
For quick storage math, a simple conversion holds up well: bitrate in Mbps times 10.8 gives you an approximate figure in gigabytes per day of continuous recording. A 4 Mbps stream running around the clock lands near 43 GB per day; drop that to 2 Mbps with H.265 and you’re looking at roughly 22 GB.
Run this acceptance test after every change, in this order:
- Record a baseline reading with the camera idle, no motion in frame.
- Test a single camera under normal daytime activity.
- Test all cameras simultaneously during a busy period, since synchronized motion events stack differently than isolated ones.
- Repeat at night, when infrared and low-light noise can push bitrate up even on a completely static scene.
- Confirm your retention window still holds the footage you need at the new settings before calling it done.
Design your uplink for the motion spike, not the average. VBR streams idle low and jump hard the moment something moves.
A Step-by-Step Checklist for Cutting Bandwidth Safely
Change one thing at a time. Bandwidth tuning done all at once makes it impossible to know which setting actually helped, or which one just broke your night recordings.
- Record your baseline using real measured throughput, not spec numbers.
- Switch to H.265 if your cameras and VMS both support it.
- Right-size resolution to what your use case genuinely requires.
- Lower frame rate to 15 to 20 FPS on fixed, non-critical cameras.
- Set a VBR cap instead of running uncapped or full CBR.
- Enable the smart-codec feature if your camera and decoder support it.
- Fine-tune GOP length for a balance of bitrate and seek responsiveness.
- Apply network and host tuning from the previous section.
After each step, check three things: the live view still looks acceptable, a recorded clip plays back cleanly, and seeking through that clip doesn’t lag. Stop adjusting once footage still meets your forensic threshold, meaning you can still make out the detail you’d need in an incident, whether that’s a face, a plate, or a package. Keep a written log of what you changed and when, so you can roll back a single setting instead of guessing which of eight changes caused a problem.
Can Content-Aware Streaming Cut Bandwidth Even Further?
Researchers are pushing past vendor smart codecs into systems that allocate bandwidth based on what’s actually in the frame, not just where motion happens to be.
- DeepStream, an academic multi-camera streaming architecture, uses region-of-interest detection and content-aware allocation to send more bits toward areas an analytics model cares about and fewer toward everything else.
- In-network selective frame dropping applies similar logic at the switch level, deliberately dropping less-important frames on a congested link rather than letting everything degrade equally.
Evaluations of the DeepStream approach show up to 54% bandwidth savings with less than a 1% drop in detection accuracy for analytics workloads, a meaningfully better trade-off than blanket resolution cuts.
For most homeowners and small retail setups, this is more than you need. It matters if you’re running a fleet of dozens of cameras feeding into video analytics, where edge compute costs and bandwidth costs both scale with camera count. If you’re managing five cameras at a single storefront, a good codec and sensible resolution choices will get you most of the way there.
What Should You Actually Prioritize?
Cost and reliability beat perfect image quality almost every time, in my read of how this plays out for real installs. A homeowner watching a driveway can live with 15 FPS and 1080p; a small retailer needs enough resolution to read a face at the register, but not 4K on every angle; a remote site with a limited data plan should lean hardest on smart-codec features and local recording. Upgrade hardware or call in an installer when your network keeps dropping frames after tuning, or when you need forensic-grade detail (plates, fine text) that your current cameras simply can’t deliver no matter how you configure them. Measure first. Always.
— Safes and Security Solutions
Safes and Security Direct: Cameras Built to Work With These Settings
Getting these bandwidth settings right starts with a camera that actually gives you the controls to change them. A lot of budget cameras lock you into fixed bitrate profiles with no access to GOP length, VBR caps, or smart-codec toggles, which means half of what you just read doesn’t apply to your hardware.

Some retailers carry home and business camera systems with cloud storage and mobile alert options built around modern, efficient codecs rather than legacy compression. Before you buy, check that your chosen system’s codec and stream settings match what your VMS or NVR can decode. Mismatched hardware is the single most common reason people configure a smart codec and see no savings at all. Our security camera buying guide walks through exactly which specs to check before you commit to a system, and our VMS and software overview covers which recording platforms play well with dual-stream and H.265 setups. Browse our current camera systems and accessories on Safes and Security Direct to find a setup that fits your bandwidth budget from day one.
Sources
- H.264 vs H.265 — Ant Media
- Optimize low bandwidth mode — Verkada support
- DeepStream: A bandwidth efficient multi-camera video streaming system for deep learning video analytics — arXiv
FAQ
What Is Killing My Camera Bandwidth?
Usually it’s a combination of high resolution, high frame rate, and an inefficient codec running all at once, plus network waste from dropped packets forcing retransmits. Check your codec setting first: cameras still running H.264 at full resolution and 30 FPS are the most common bandwidth hogs in small installs.
How Much Bandwidth Does a 4K Camera Need?
It depends heavily on codec and frame rate, but a 4K stream on H.264 at 30 FPS commonly runs several times higher than the same camera set to 1080p on H.265. Switching that same camera to H.265 alone can cut its bitrate by roughly 50% without changing resolution at all.
How Do I Decrease My Camera’s Bandwidth Usage?
Start with codec, then resolution, then frame rate, in that order, and enable your camera’s smart-codec feature if it has one. Dropping frame rate from 30 to 15 FPS alone cuts bandwidth roughly in half, and stacking that with an efficient codec compounds the savings further.
Is It Better to Have High or Low Camera Bandwidth?
Neither extreme is correct; the goal is matching bandwidth to what the camera actually needs to record useful footage. Too high wastes network capacity and storage, while too low risks losing the detail you’d need to identify a face or plate during a real incident.
Does Safes and Security Solutions Sell Cameras That Support Bandwidth-Saving Codecs?
Some retailers offer home and business camera systems with cloud storage and mobile alerts designed around modern codec support. Current pricing and specifications are available on the Safes and Security Direct site, where you can confirm codec and VMS compatibility before purchase.